- Wild Style Magazine
- Roofing
- What to check on your roof and siding after a hail or wind storm
What to check on your roof and siding after a hail or wind storm
Find out how to spot hail damage roof signs safely from the ground and record the details you need for a smooth insurance claim after a storm hits.
Words by Reuben Stillwagon7 min to read
A severe storm leaves visible marks on your property that insurance companies need to see. You can spot hail damage roof signs and siding dents right from your yard without climbing a ladder. Gather your camera and take a slow walk around the house to document the impact.
What counts as a severe weather event
High winds and large hail can wear down roofing and siding quickly. The National Weather Service defines a severe thunderstorm as one capable of hail an inch or larger or wind gusts over 58 mph.
Hail that size can damage asphalt shingles and metal panels. Wind gusts over that speed can lift loose boards and break branches.
If your neighborhood saw a storm reach those marks, you have good reason to check your exterior. Smaller hail often does little harm. Hail an inch wide can hit hard enough to damage weak spots in the roof.
Walk the ground before you look up
You can assess the condition of your home safely from the ground. A steep roof is dangerous to climb on a normal day. It becomes completely unsafe when the surface is wet and covered with scattered branches.
Walking around the yard gives you a clear view of the lower roof sections and your siding. Before you head outside, gather a few basic items to help you record what you see.
- Take a digital camera or a fully charged phone to snap clear photos.
- Carry a plain notepad and pen to write down where you spot damage.
- Use binoculars to inspect the high roof ridges and chimney flashing.
- Wear closed-toe shoes to protect your feet from sharp debris hiding in the grass.
Look at the ground first. Finding pieces of torn shingle or broken vinyl in the grass tells you right away that the storm left a mark. Check your patio furniture and wooden fences. Hail that cracks a plastic chair or dents a metal table probably hit your roof just as hard.
Inspect the soft fins on your air conditioning unit, as the thin metal bends easily under pressure. Dented fins mean hail blew in hard from that side of the house. Take note of scattered debris on your asphalt or concrete driveway before you look up. Leaves and small twigs are normal, but large chunks of roofing material mean trouble.
Check the attic for hidden water damage
Sometimes the worst damage hides out of plain sight. After walking the yard, grab a flashlight and look into your attic if you can reach it safely. Do this during the day so sunlight can expose any fresh holes in the roof decking.
Turn off your flashlight and look up. Any pinpricks of daylight shining through the wood can mean a falling branch or heavy hailstone punched through the roof.
Turn the flashlight back on to check the insulation. Wet insulation often looks flattened and darker. Look for dark water trails running down the wooden rafters, which can show where the rain got in. A damp smell in the attic may point to a leak worth having checked.
Roof signs to spot from the ground
Roof storm damage shows up in specific patterns. Look at the metal parts of your roof first. Hail leaves clear round dents on aluminum vents and metal flashing. A dimpled exhaust vent is a simple sign of impact worth photographing.
Metal parts show hail strikes clearly. Look closely at the metal chimney cap. A heavily dented cap can go with shingle damage nearby.
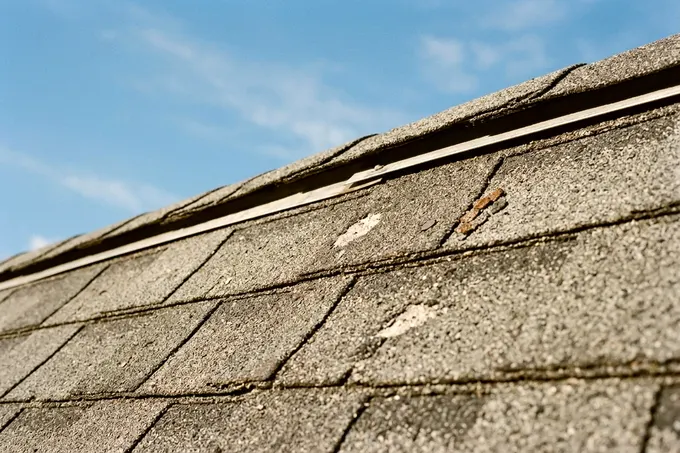
Scan the main roof surface for loose or missing materials. High winds catch the edges of older roofs and tear whole sections away, leaving the bare underlayment exposed to the next rain. Bruised shingles look like dark circular spots where hail knocked the protective rock coating away. These hard impacts can crack the fiberglass mat underneath.
If you are deciding between a metal roof or asphalt shingles for a future upgrade, keep in mind that metal dents while asphalt loses its protective grit.
Check the end of your downspouts. Heavy rain and hail wash thick layers of shingle granules into your gutters. A large pile of coarse sand at the bottom of the spout can mean the storm stripped granules off your roof. That grit helps protect the asphalt, and shingles that lose a lot of it may wear faster.
Siding cracks, dents and warped trim
Hail damage siding issues vary by the material covering your exterior walls. Vinyl siding takes a heavy beating from strong winds and flying ice. You might see small circular cracks or half-moon shapes where hailstones punched straight through the plastic.
High wind pulls vinyl panels loose from their locks and leaves them flapping. Look closely at the window wraps and warped trim pieces near your doors. The thin metal surrounding the window frame shows dents very clearly.
Aluminum siding reacts differently to ice impacts, as hail often leaves dents in the metal instead of cracking it. These dimples show up clearly when the sun hits the wall at a low angle in the morning or late afternoon. Walk around the house twice at different times of day. A shadow cast at sunset reveals small dents that flat midday light hides.
Wood boards and fiber cement planks might show chipped paint or split edges where hail struck a glancing blow. Look for fresh wood exposed underneath the top coat of paint. Paint splatters on the ground below the wall give away fresh chips above.
Check all four sides of the house. Storms often blow in from one direction. The west wall might show heavy damage while the east side looks fine. Look for torn window screens and cracked glass on the side that took the direct hit.
Photograph and list the mess before cleanup
Your insurance company needs proof of the mess before you fix anything. Take clear pictures of every damaged spot before you move a single piece of debris. Wisconsin's insurance commissioner advises taking photographs of the damage before you begin to clean up.
Snap wide shots of the whole yard to show the scale of the debris. Follow those up with close views of individual broken items. Write down a simple list of everything the storm broke or moved.
Keep all pieces of broken siding or torn shingles in a pile. Wisconsin's insurance commissioner says not to throw out damaged property without the claim adjuster's agreement. The adjuster may want to see the broken pieces. Wait for their visit before you drag any ruined materials to the curb or call the city bulk trash pickup.
Cover exposed areas and track your costs
Stopping rain from causing worse leaks inside the house helps, so cover broken windows with heavy plastic. Hire a local handyman or roofer to do the dangerous temporary work on the roof. They can anchor heavy tarps over exposed roof decking. Move wet items out of the rain so they do not grow mold.
Keep track of what you spend to secure the house. Wisconsin advises keeping all receipts that document the cost of repairs or replacement of damaged items. Buy a dedicated folder and place every hardware store receipt inside to prove what you spent on tarps, wood and nails to keep the weather out. These receipts document what you spent on your emergency steps.
Start the claim and learn the state rules
Start the process with a phone call to your insurance provider. Wisconsin's insurance commissioner advises notifying your insurance agent or company right away to begin the claim process. They can assign a claim number and schedule an adjuster to visit your home. Ask them exactly what temporary fixes they expect you to make.
Watch out for fast sales pitches after a storm. Some states set strict boundaries for roofing companies. Under Wisconsin's storm chaser rules a contractor cannot promise to pay any part of your insurance deductible or negotiate with your insurer on your behalf.
Your deductible is set by your policy, so treat any promise to cover it as a red flag. Ask neighbors or your insurance agent for contractor recommendations.
When to call a storm restoration specialist
Reach out to a local expert once you have your claim started and your property secured. A professional roofer knows how to walk a steep pitch safely and spot subtle impact marks. A local contractor provides a second set of eyes to document the total scope of the work.
Understanding what happens during a roof replacement gives you a sense of why accurate estimates matter so much. You need someone who understands exactly what the local building department requires for repairs. If you need storm restoration in Appleton, ask your local building department whether the repair needs a permit and an inspection.
They take their own photos and write up an estimate for the full job. You can hand this estimate to your insurance adjuster to review. A reliable contractor focuses on fixing the house correctly and leaves the insurance decisions up to you and your provider.


