
- Wild Style Magazine
- Outdoor Kitchens
- How to plan a DIY outdoor kitchen from grill to counter
How to plan a DIY outdoor kitchen from grill to counter
Planning an outdoor kitchen diy project takes a clear layout, the right materials and safe utility hookups. Learn how to frame an island and pick counters.
Words by Rory Sundquist7 min to read
Building an outdoor kitchen diy setup starts with drawing the layout that fits your cooking habits. You then frame the island, top it with weather-resistant counters and connect the grill. A good plan keeps costs down and puts every tool right where you need it.
Plan for the way you cook and host
Your layout depends entirely on what you cook. A homeowner who smokes briskets needs different equipment than someone flipping burgers for a large crowd. Make a clear list of the appliances you actually use every week. Buying every available gadget eats up your budget and crowds the workspace.
Grills form the center of the kitchen. Gas grills heat up fast for weeknight dinners and require very little cleanup after you finish cooking. Charcoal and wood smokers take more time but deliver a better flavor profile for slow cooking. Think about side burners for boiling corn or heating sauces right next to the main fire.
Count the people you usually host. A family of four works well with a standard grill and a small prep space. Large parties require wider grates, extra warming racks and plenty of counter room for plates. A massive holiday gathering demands a wide grill and an outdoor refrigerator to hold cold drinks.
Pick a safe spot in the yard
Safety dictates your kitchen location above all else. The National Fire Protection Association advises that propane and charcoal grills be used only outdoors and placed well away from the home, deck railings and out from under eaves and overhanging branches. A sudden flare-up near vinyl siding can damage the plastic.
Watch the wind in your yard. A breeze blowing toward the house sends smoke straight into your open windows. You want the wind carrying smoke away from the dining area and your neighbor's property. Stand in your yard on a few different afternoons to learn the typical wind patterns.
Look down at the ground. You need a solid, level foundation. A concrete slab or a flat paver patio makes a solid base for heavy masonry islands. If you plan to build over a wood deck, ask a licensed pro or your building department to confirm the deck can carry the extra weight of your appliances and stone counters.
Map out your cooking and serving zones
A smart kitchen separates distinct work areas to stop people crossing paths. The hot zone holds the grill, side burners and pizza ovens. Keep this area away from foot traffic so nobody bumps into a hot surface. The cook needs room to stand and move without tripping over guests.
The cold zone houses the refrigerator or drop-in ice chest. Place it near the outer edge of the kitchen setup. Guests can grab a drink from the fridge without crossing into the cooking space.
Your wet zone contains the sink and the trash pull-out. Put the sink right next to the main prep counter so you do not carry dripping food across the patio. You will wash vegetables, rinse cutting boards and wash your hands frequently while handling raw meat. A deep basin works better than a shallow bar sink.
The serving zone requires open, flat counter space. You need room to set down large platters of food before and after they hit the fire. Plan for wide, clear space on one side of the grill and a smaller landing pad on the other side.
Frame the island or use a modular kit
The island frame supports the heavy countertops and holds the stainless steel appliances. You have three main ways to build the base:
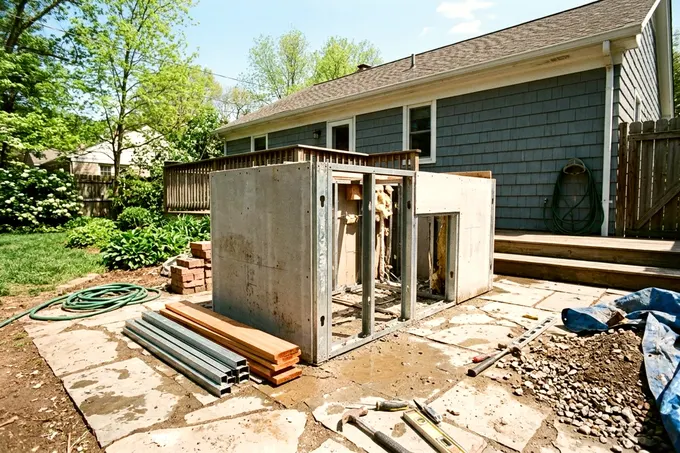
- Concrete blocks create a permanent, noncombustible base that you stack on a poured footing and finish with stone veneer.
- Metal framing uses welded tubular steel or galvanized steel studs covered with cement backer board.
- A premade outdoor kitchen arrives as modular sections that you bolt together on site.
Masonry takes time and heavy lifting, making it a slow job for one person. Metal framing goes up fast and does not burn like wood. A modular kit saves days of hard labor, trading custom dimensions for speed. A kit makes sense if you have a flat patio and want to start cooking by next weekend.
Choose outdoor countertops that handle weather
Outdoor counters face harsh rain, hot pans and winter freezes. Granite stands up to tough weather and resists stains when sealed properly. Light colors usually stay cooler in direct sun than dark stones, which can get hot enough to burn bare hands on a summer afternoon. Ask your stone supplier which slabs hold up outdoors in your climate.
Concrete offers a completely custom look. You can pour it in place on top of the island or cast it upside down in molds. Concrete needs regular sealing to block grease stains from dropped food and hot oil. Hairline cracks can appear over time, so ask your installer what to expect.
Be careful with porous materials like marble or standard indoor ceramic tile. The grout lines trap dirt and absorb standing water. Water freezing inside a tile joint can pop tiles loose over the winter. Soapstone handles heat well and resists staining, though it scratches easily if you slide a heavy cast iron pan across it.
Hire professionals for gas and electrical lines
Local building codes strictly regulate outdoor utility lines. Most areas require permits for new gas, electrical and plumbing runs, so ask your building department before you start digging. Your local building department can explain the required trench depths and the proper pipe materials for underground lines. Call the local utility marking service before you put a shovel in the dirt.
Hire a licensed professional to run the main gas line. A plumber will size the pipe correctly to ensure your grill gets enough fuel based on the total output of all your burners combined. Weak gas flow can cause poor heating. The plumber also handles the final connections and tests the entire system.
An electrician must wire the outdoor outlets and lighting. Local electrical code usually calls for ground fault protection on outdoor circuits, and the electrician will know the rule. You may be able to dig the trenches yourself if your building department and the pros agree, but let the professionals handle the wire and pipe. Running water may need a drain line tied into your home sewer system, which makes the plumbing more complex, so ask a licensed plumber and your building department.
Perform basic grill safety checks
Regular maintenance keeps your kitchen safe and running smoothly. The NFPA says July is the peak month for grill fires. Inspect your equipment closely before summer starts.
The Consumer Product Safety Commission advises checking for gas leaks by brushing a solution of one part water and one part liquid detergent on connection points, where bubbles mean a leak. If you see bubbles, turn off the gas and tighten the connection. If the bubbles continue, close the container valve and take the grill to your LP gas dealer or a qualified repair person.
Insects and spiders can build nests inside burner parts. The CPSC advises checking the grill's venturi tubes for blockages from insects, spiders or food drippings at least once a year. Clear any blockage with a pipe cleaner or wire, as the CPSC suggests, or follow the grill maker's instructions.
Keep the cooking area completely clear while the fire burns. The NFPA advises keeping children and pets at least three feet away from the grill area. Mark a physical line on the patio if you have young kids running around the yard.
Add shade, lights and comfortable seating
Cooking in direct afternoon sun gets uncomfortable fast. A wood or metal pergola can block the harsh rays over your seating and prep areas. Solid patio covers block rain, but keep the grill itself out from under any cover or eave, as the NFPA advises, and follow the grill maker's clearance rules.
Task lighting keeps you cooking safely after dark. Mount bright lights directly above the grill so you can check meat temperatures accurately. Low-voltage path lights guide guests safely around the patio edges and seating walls. Add soft ambient lighting under the counter overhang to illuminate the bar stools.
Plan your seating so the cook stays part of the party. Bar stools along the back of the island let guests chat while you flip burgers. Leave a deep counter overhang so people have room for their knees.


