- Wild Style Magazine
- Outdoor Kitchens
- 9 outdoor bar ideas from a rolling cart to a built-in counter
9 outdoor bar ideas from a rolling cart to a built-in counter
Explore nine practical outdoor bar ideas for your yard from a simple rolling cart to a built-in counter with seating and smart drink storage.
Words by Rory Sundquist8 min to read
An outdoor bar gives guests a place to sit and sets up a clear zone for drinks away from the grill. These nine setups fit different budgets and yard sizes to make outdoor entertaining easier. A dedicated drinks station keeps traffic out of the cooking space and gives you a central place to store glasses, ice and mixers.
1. A rolling cart that parks by the grill
An outdoor portable bar on wheels lets you move the drinks where the people gather. A rolling cart takes up very little floor space and parks easily against a house wall or next to the grill. You load the bottom shelves with heavy bottles and keep the mixing tools on top. Carts come in metal, painted wood or tough outdoor plastics that wash clean with a simple spray from the garden hose.
Push the cart under an umbrella or wheel it right into the garage when rain threatens. Since it rolls, it rarely needs dedicated seating, so just position it near your existing patio chairs. Secure the wheel locks, and keep the cart off slopes and uneven paving where it could roll. If you entertain in the evening, clip a small battery light to the side of the cart so you can see what you are pouring.
2. A folding bar attached to a fence
A drop-down bar hinges to a fence or exterior wall that is strong enough to carry the load. You pull the wooden counter up and lock it into place with folding brackets when guests arrive. Once the party ends, unlatch the heavy-duty brackets to let the surface drop flat and open up your yard again. Use stainless steel hinges for this project, since standard steel hinges can rust in the rain.
This setup works well in tiny yards or narrow side passages where a permanent table would block the way. You sacrifice deep built-in storage with a folding design, so keep a heavy cooler on the ground nearby and store your delicate glasses indoors. Position the bar on a fence that catches afternoon shade, or mount a small cloth awning above the hinges to keep the direct sun off your guests. Sand the front edge of the counter smooth so nobody snags their clothes on it.
3. A counter along a deck rail
A wide plank secured along the top of your deck railing turns a wasted edge into a counter. This setup mimics a long tavern bar and gives people a place to rest their glasses while looking out over the garden. You use heavy metal brackets to tie the wooden counter to the existing railing posts. This helps keep the structure rigid.
Pull tall weather-resistant stools right up to the rail for immediate seating that leaves the center of your deck completely open for other furniture. If you plan to add a heavy solid wood top, check with your local building department or a licensed pro that the existing railing posts can hold the extra weight safely. Keep a small storage bin nearby to hold napkins and bottle openers. Apply a clear outdoor sealant to the wood to protect it from condensation rings.
4. A pallet or reclaimed wood bar
Building a bar frame out of wooden pallets or salvaged lumber can keep material costs low. You stack and secure the pallets to form the front and side walls, then attach a smooth, flat top for preparing drinks and serving food. The hollow spaces inside the standing pallets naturally form narrow shelves for extra bottles, plastic cups and bar tools. You can even attach a length of iron pipe across the bottom of the front pallets to create a sturdy footrest for your guests.
You must sand the rough boards thoroughly and seal the wood with an exterior waterproof finish to prevent splinters and stop the wood from rotting. Reclaimed wood brings a relaxed, rustic look to the yard, but it needs regular maintenance to keep it looking sharp. Place this bar on a flat, hard surface rather than directly on the grass so the wooden base stays dry. Before you start cutting, find out how the pallets were treated, check any markings or labels on them, and skip any you are unsure about.
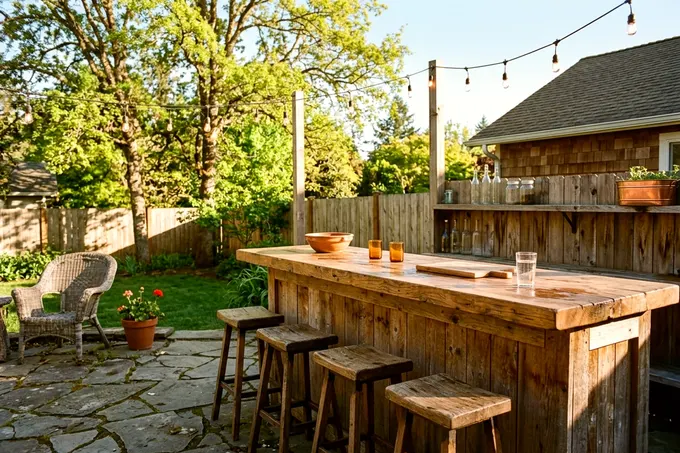
5. A built in bar with stools on a patio
A permanent masonry or framed bar turns a bare patio into a gathering spot. You construct the base using concrete blocks or heavy framing lumber wrapped in stone veneer, topped with a thick slab of stone or poured concrete. This gives you a solid footprint that matches the exterior style of your home or your garden retaining walls. A stone bar feels permanent and solid.
A built-in structure allows you to install deep cabinets and stainless steel drawers for permanent outdoor storage. Leave a wide overhang on the counter facing the yard so guests have plenty of knee room when they sit on bar stools. If you are starting from scratch, plan the bar during your paver patio installation so the foundation blocks sit on a perfectly level base. Seal a concrete or natural stone top carefully to help keep spilled wine from staining it.
6. A bar tucked under a pergola
Putting your bar beneath a wooden pergola defines the space and provides instant overhead shade. The slatted roof cuts down harsh sunlight and gives you a sturdy frame to hang outdoor pendant lights. You can build the bar counter between two of the main support posts, but check with a licensed pro before you attach anything that adds load to the pergola. Planting climbing vines at the base of the posts adds a layer of natural green shade over the roof as the plants mature.
This combination works equally well with an island counter or an L-shaped bar. Keep the seating facing out toward the yard, and set the counter back slightly from the edge of the roof to keep rain off the bartender. Reading through different pergola ideas for shade is a good place to start, and a licensed pro can confirm how far apart to space the posts. The serving area needs enough width so people can pass behind the stools comfortably without knocking into the columns.
7. A converted shed or kiosk bar
Turning a small garden shed into a serving kiosk creates a standalone bar with a solid roof and lockable doors. After checking local rules and the wall framing, you cut a wide serving window into one side of the shed and attach a hinge-up awning. A counter mounts directly on the window ledge so guests step right up to order a drink. Paint the inside of the shed a bright, light color so you can see what you are doing in the shadows.
The inside of the shed gives you plenty of storage room when you line the walls with deep shelves for glasses and heavy coolers. At the end of the night, you simply close the window and lock the main door to protect everything from the weather and neighborhood animals. Set up small tables and chairs scattered on the grass nearby since a kiosk does not support traditional bar seating. Add a battery-powered lantern inside the shed to keep the drinks flowing after dark.
8. Keep ice and drinks cold without a hookup
A functional outdoor bar needs a way to chill drinks even if you skip the expense of running electrical lines and plumbing. A drop-in ice chest installed directly into the counter surface keeps cold drinks right at hand. You cut a hole in the countertop and drop in an insulated stainless steel bin so it sits flush. Use block ice in the bottom of the bin to keep the temperature down, and pour cubed ice over the top to chill the cans rapidly.
Make sure the metal bin has a bottom drain hole and run a short plastic tube down to a hidden bucket to catch the melting ice. For a simpler route, build a wide lower shelf into your bar frame sized specifically to hold a heavy-duty camping cooler. This keeps the bright plastic cooler out of sight but lets you slide it out easily to grab a fresh drink. Keep a separate, smaller cooler on the counter just for the clean ice you plan to put inside the glasses.
9. Choose weatherproof surfaces
The materials you pick for the bar top decide how long the setup lasts. The counter takes heavy abuse from spilled drinks, dropped glasses and constant weather exposure. Poured concrete, natural stone and large porcelain tiles wipe clean easily and can hold up well to weather. If your bar does double duty as a serving buffet, these materials are less likely to scorch than wood when you set down a hot pan from the grill.
Wood tops look warm and inviting, but they need regular sanding and sealing to help prevent water damage. If you choose wood, ask your supplier which species suit outdoor use and try to keep the bar under a covered patio. Avoid standard indoor tile and basic plywood, which are not made for rain. Slope the counter very slightly toward the front edge so rainwater runs off instead of pooling around your bottles.
Planning your bar layout for easy entertaining
The best spot for your bar depends on how you and your guests move around the yard. Place the drinks station away from the heavy smoke of the grill, but keep it close enough that the cook can talk to guests easily. A good layout creates a clear traffic path from the back door to the bar that never crosses the cooking zone. If you use a rolling cart, map out a clear path over flat paving so the wheels do not sink into the soft lawn.
Think about lighting early in the project because pouring drinks in the dark leads to spills and broken glass. Use outdoor rated lights, and hire a licensed electrician for any new wiring. Check your local building department website before you pour deep footings or build overhead structures so you know exactly which permits you need to pull.


