
- Wild Style Magazine
- Patios and Pergolas
- How to install a paver patio that stays flat
How to install a paver patio that stays flat
Installing patio pavers requires a solid base to keep the surface flat over time. Learn how to dig, compact the gravel, level the sand and lock in the edges.
Words by Rory Sundquist6 min to read
Installing patio pavers takes heavy digging and tight compaction to build a base that stays flat. You must remove the soft topsoil, compact a deep gravel foundation in layers and lay the stones over a thin bed of leveled sand. Edge restraints and joint sand lock the finished surface together.
Request utility marks before you dig
Before you stick a shovel in the yard, you must find out what is buried there. Hitting a pipe ruins your weekend and puts your safety at risk. You can prevent this by making a quick phone call.
811 describes itself as the free national before you dig service. You tell them where you plan to work. They send workers from the local utility companies to your house, and the wait depends on your state.
Utilities mark lines with colored paint or flags, and gas lines are marked in yellow. Dig carefully around these marks, because they show approximate locations. You should also check with your local building department for permits before starting.
Lay out the patio and set the slope away from the house
A DIY paver patio project starts with stakes and mason line. You need to outline the shape in the grass. A flat patio still needs a slight tilt to shed rainwater. The water needs a clear path away from your foundation.
Unilock's patio installation guide recommends a slope of 1.5% to 2% and a bedding course 1 inch thick. You set this slope by tying a string level between wooden stakes. You measure down from the level line to find your final grade. A simple tape measure tells you exactly how far down you need to dig at any point.
You also need extra room around the outside. The same Unilock guide says to excavate at least 6 inches beyond the paver edge and that all edges of a paver patio must be restrained. You mark this wider border on the grass with marking paint.
Dig out and compact the subgrade
The dark topsoil under your lawn is too soft to hold heavy stones. You have to dig down to firm dirt. Digging out a patio by hand is tough work. Rent a small excavator if your yard has wide gate access.
Your total digging depth depends on the soil under your yard. You add the thickness of the pavers to the sand and the gravel foundation. Tell your material supplier what kind of dirt you have. Always follow your own paver maker's instructions for your soil.
Unilock's patio installation guide gives typical base figures. It calls for 6 to 8 inches of base gravel over well draining subsoil and 10 to 12 inches over poorly draining subsoil.
Soil type | Base gravel depth |
|---|---|
Well draining subsoil | 6 to 8 inches |
Poorly draining subsoil | 10 to 12 inches |
Clay soils often drain poorly and may need a deeper foundation, while sandy soils often drain well. Once you reach the right depth, run a rented plate compactor over the bare dirt to pack it down.
Build and compact the gravel base in layers
The gravel foundation is the most critical part of a patio paver base. If the gravel settles later, your patio will sink and hold puddles. You build this base using crushed stone with jagged edges that lock together. Round river rock will roll around and ruin your foundation.
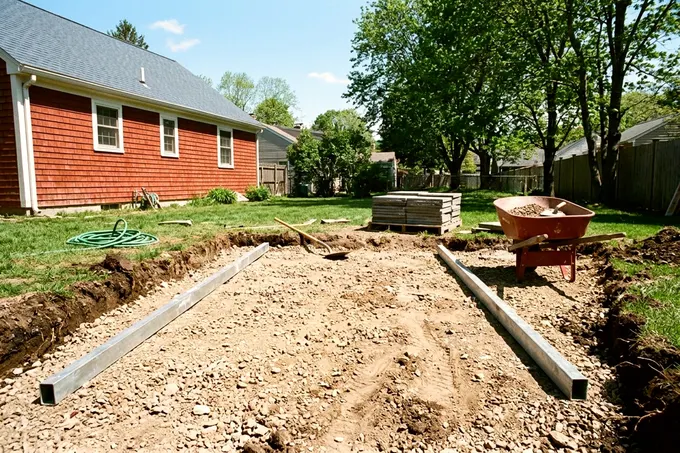
You cannot dump all the gravel into the hole at once. A plate compactor cannot push its force all the way to the bottom of a deep pile. Unilock's guide has the base gravel placed and compacted in 3-inch layers.
Spread three inches of gravel across the dirt with a heavy rake. Wet the stones lightly with a garden hose to keep the dust down. Run the plate compactor over the whole area in overlapping rows.
Add the next layer and compact it again. Repeat this process until your base reaches the correct height. Check your slope with a level as you build up the base. Your gravel surface needs to match the final tilt of the patio.
Screed the bedding sand
Bedding sand creates a smooth surface for the pavers to sit on. You use sharp coarse sand for this step. Do not use limestone screenings or mason's sand.
You spread the sand out evenly using a process called screeding. This step requires patience and a good set of knees. Use metal pipes as your guides.
- Lay 1 inch metal pipes on the compacted gravel base.
- Pour the coarse sand loosely between the pipes.
- Pull a straight wooden board across the pipes to level the sand.
- Pull the pipes out and fill the empty tracks with a hand trowel.
Do not run the compactor over the sand. You must not walk on the smooth surface once you level it. Any footprints will create low spots in the finished patio.
Lay the pavers and cut the edges
Start laying the stones at the lowest corner or against a straight wall. You drop each block straight down into the sand. Sliding them will push the sand into piles and ruin your smooth bed.
Many patio blocks have small bumps on the sides. These built-in spacers keep the joints even. If your stones lack these bumps, leave a tiny gap between them. You can kneel on the stones you just laid to reach the next row.
You will eventually reach the outside border. Most patterns require partial stones to finish the edges. You mark the cut lines with a pencil. Rent a saw that cuts dust free, such as a wet saw, and wear eye, face, hand and lung protection.
Some yards suit concrete slabs over individual blocks. You might look into a stamped concrete patio if you prefer avoiding joint sand altogether.
Fix the edge restraint and sweep in joint sand
The stones will drift outward over time if you leave the borders open. You need a solid barrier locked into the foundation to hold them tight.
Place plastic or metal edging flat on the extended gravel base. Push it tight against the outside border blocks. Drive long steel spikes through the holes in the edging down into the compacted gravel.
Keep the surface clear of sand and debris, then run a plate compactor with a polyurethane pad over the pavers for at least three passes in three directions. Then sweep joint sand into the gaps with a stiff broom until they look full.
Compacting settles the blocks into the bedding sand and evens out small height differences. Pick a day with no rain expected for the joint sand and follow the directions on the product label exactly.
Care for the patio in its first year
Heavy rain can wash some sand out of the joints. You should keep a spare bag of joint sand in the garage.
Sweep extra sand into any low joints on a dry afternoon. Check the outside edges to ensure dirt is not washing away from your restraints. You might want to plant grass seed against the edging to hold the soil in place.
Pull any weeds that sprout nearby before their roots find the sand joints. You can eventually build upgrades around your finished surface. You might look at pergola ideas for shade or explore fire pit patio ideas once the stones settle.


