
- Wild Style Magazine
- Garden Design
- How to plan a garden layout before you dig a single bed
How to plan a garden layout before you dig a single bed
Plan a practical garden layout that fits your yard well by mapping sun, water, and daily foot traffic before you dig a single bed.
Words by Sybil Rademaker7 min to read
A successful garden layout starts on paper with a map of the sun, water, and paths your yard already has. Finding these zones helps you decide where plants may do well and where you should leave space to walk. This planning step can save you from moving beds or losing plants later.
Map your yard for sun and shade
A good paper map is the foundation of your plan. Measure your property lines, house, and outbuildings with a long tape. Transfer these measurements to a piece of graph paper using a simple scale. Sketch the footprint of your home, the existing trees, and any concrete pads.
Watch your yard from morning to late afternoon on a sunny day to see how the light moves. The south side of your house stays warmer and gets bright light all day while the north side casts a long shadow. East-facing areas get gentle morning sun, and west-facing spots bake in the hot afternoon heat. Draw these sunny and shaded zones on your map.
Climate matters too. The USDA Plant Hardiness Zone Map is based on the average annual extreme minimum winter temperature and can be searched by ZIP code. Knowing your zone helps you pick shrubs and perennials that survive the cold.
Local microclimates on your own lot matter just as much. A brick wall facing south can hold heat after dark, and a low spot in the far corner might frost over early in the fall. Wind through open gaps between houses can dry out leaves. Add these details to your map.
Mark where water collects
Watch what happens to your yard during a heavy rainstorm. Water naturally moves down hills and gathers at the lowest points. Walk outside after the rain stops and look for puddles that refuse to drain. Mark these damp spots on your paper plan.
Plants that need dry roots can rot in standing water. You can plant species that tolerate wet soil, or you can build the ground up. Clemson Extension says gardeners with poorly drained or steeply sloped sites can improve them with raised beds. You can build raised garden beds to keep roots out of the soggy ground.
Mark the high, dry spots on your map too. Soil at the top of a slope drains fast, especially if it is sandy. These dry zones will need a hose or irrigation line nearby.
Pay attention to your gutters. Downspouts can dump a lot of water near your foundation. Draw arrows on your map to show where this runoff flows. You can direct this water away from your house and toward plants that need it.
Trace the paths you already walk
A yard works best when you respect the ways people actually move. Look at the worn grass between your back door and the garage. Look at the direct line from the patio to the trash cans. These desire lines show where paths naturally belong.
Draw these main routes on your plan before you draw any planting beds. Make primary paths wide enough for a wheelbarrow and a person to pass. Secondary paths between planting beds can be narrower. A tight path gives you just enough room to push a mower or carry a bucket.
Running a path through the middle of a work zone makes yard maintenance harder. Pave the routes you already use, since laying a flat paver patio or a simple walkway sets the structure for everything else. People walk where the ground is firm and flat. Give them a clear route so they stay out of your dirt.
Place your beds, lawn, and seating
Now you can assign spaces to the blank areas on your map. Block out the hardscape first. Patios, decks, sheds, and paths go in before the plants. Next, outline your planting beds and the remaining lawn.
Keep the design realistic for the time you have. Clemson Extension recommends planning the garden on paper first and keeping it as small as possible to cut unnecessary work. A massive lawn takes hours to mow every weekend, and a giant flower bed takes time to weed and mulch. Balance the two based on your schedule.
Define the shapes of your beds clearly with strong borders. Sweeping curves look natural and are easy to mow around. Straight lines look formal and work well in small, square yards. You can use simple garden edging ideas to keep mulch from spilling into the grass.
Leave space around your air conditioner unit for repairs. Keep prickly bushes away from walkways and windows. Add a spot for a bench or a chair in a shady corner.
Group plants by their needs
Put plants that crave the same conditions in the same bed. Sun-loving plants go in the bright spots you mapped earlier. Shade plants go under trees or on the north side of the house.
Thirsty plants belong near the water source or in the lower, damper zones. Drought-tolerant plants go in the high, dry areas. Mixing a desert plant with a moisture-loving plant will likely stress one of them.
Grouping plants by water needs makes irrigation simple. You can run a single drip line to a bed of thirsty flowers, and leave the dry shrubs alone. This method is called hydrozoning. It can cut water use and help plants stay healthy.
Think about the mature size of every plant. A small shrub looks harmless in a one-gallon pot, but it might block a window or crowd out a path later. Draw circles on your plan that match the full, mature width of each plant. Overcrowded plants compete for water and air.
Fit a vegetable garden layout into the sun
Vegetables need plenty of light to produce a harvest. Clemson Cooperative Extension says vegetable gardens in South Carolina should get at least six hours of direct sun each day. Find the brightest, most open spot on your paper map. This is where your vegetable garden layout belongs.
Keep this food plot away from large trees. Clemson Extension advises against placing a vegetable garden close to or beneath trees and shrubs. Tree roots and shade can compete with your crops for water and nutrients.
Arrange the rows or raised beds inside this sunny zone. The way you position the crops matters. Clemson Extension advises placing tall and trellised crops on the north side of the garden so they do not shade shorter vegetables.
Put tall crops such as corn and pole beans, and any trellised tomatoes, on the north edge. Plant low crops like lettuce and carrots on the south side. Leave wide paths between the vegetable beds so you can pull a cart through at harvest time.
Test the layout on the ground
Take your paper plan outside and draw it full size on the grass. Use a garden hose to outline the curves of new beds. Drive wooden stakes into the corners of straight beds and tie string between them. You can also spray lines with water-based marking paint.
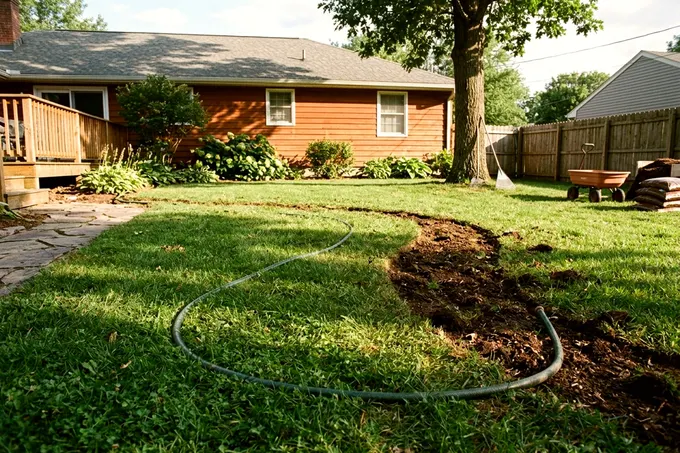
Walk the paths you just marked out. Check if you have enough room to turn a mower or push a wheelbarrow. Push an empty wheelbarrow through the stakes to be sure. A layout that looks good on paper might feel cramped in real life.
Check the width of your planting beds. A bed should be narrow enough to reach the middle from both sides. If the bed sits against a fence, keep it shallow. You need to reach the back without stepping on the soil and compacting it.
Leave the hose and stakes in place for a few days. See how the new shapes feel when you walk outside to get the mail. Look at the marked areas from your kitchen window. Adjust the lines if a bed looks too wide or a path feels too tight.
Call for utility lines and build in phases
Before you put a shovel in the ground, you must check for buried utilities. 811 says every digging project, regardless of depth, requires contacting 811 a few days in advance, including planting trees and shrubs. Utilities then mark the approximate location of buried lines.
The 811 service is free. Dig carefully around the marks. Hitting a buried line is dangerous and costs money to fix. Adjust your garden layout if a main line runs right where you wanted a deep-rooted tree.
Once you know where it is safe to dig, start your project slowly. Build your garden layout in phases to spread out the cost and the labor. Tackle the heavy jobs like retaining walls, patios, and primary paths in phase one. Add the vegetable garden in phase two, and fill in the ornamental flower beds next.
Breaking the work into pieces keeps the project affordable since you can finish one section completely before spending money on the next.


