
- Wild Style Magazine
- Garden Design
- 11 garden edging ideas that keep beds looking neat
11 garden edging ideas that keep beds looking neat
Find the best garden edging ideas for your yard from a simple spade cut to stone and steel to keep beds neat and stop grass from creeping in.
Words by Sybil Rademaker8 min to read
Garden edging defines the line between your lawn and planting beds to keep grass roots out and soil in. You can cut a simple trench with a spade or install hard materials like steel, brick and stone. The right border matches your yard and lowers your mowing effort.
1. Hand-cut spade edge
Use a garden hose to lay out your curve before you dig, then use a half-moon edging tool or a flat garden spade to slice straight down into the dirt. Step down hard on the tool to cut a clean, vertical line. Angle a second cut from the bed side to pull out a wedge of dirt. This creates a small trench with a sheer drop on the grass side.
The Illinois Extension suggests a simple edge cut with an edging tool or flat spade for new plantings and newly made beds. It costs nothing but your time.
You do have to re-cut the line to keep it sharp. Grass eventually bridges the gap and sends roots across the bare soil. Plan to touch up the trench with your spade about once a year to keep the grass out.
2. Flat mowing strips
A mowing strip is a flat border of wide stones or concrete blocks set flush with the lawn. The solid surface gives your mower wheels a smooth place to ride. The mower blade cuts the grass right to the edge of the border, so you need much less string trimming along the stone.
It takes heavy digging to prepare the ground for a permanent strip. You have to install a level base of compacted gravel and sand so the blocks stay flat over the winter.
This edge works best along long sweeps of grass where trimming takes too much time. You can match the paver material to a nearby patio or garden path. A wide strip also gives you a dry place to stand while you pull weeds.
3. Steel strip edging
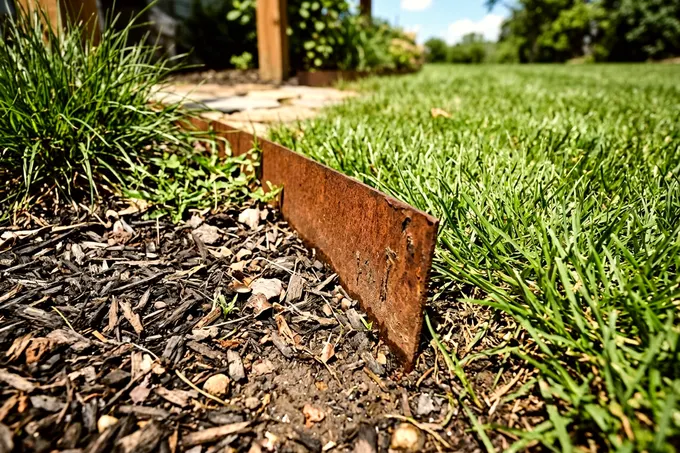
Steel edging comes in long metal bands that bend to form crisp, continuous curves. You dig a narrow slit in the ground and tap the metal down with a rubber mallet. You overlap the ends of the bands to form an unbroken barrier between the grass and the soil.
This leaves just a thin line of metal visible above the soil. The solid metal blocks grass roots and holds back mulch without drawing attention to itself. Steel eventually rusts to a dark brown finish. This natural patina blends right into the dirt for a subtle look.
It takes physical effort to bend the heavy metal into tight circles around trees. You want to stake the metal deep into the ground. Frost can push shallow strips up and leave sharp edges exposed, so set the metal deep and check it each spring.
4. Aluminum strip edging
Aluminum edging works a lot like steel but bends much easier. You can shape it around a small tree ring or a tight corner. You do not have to fight the heavy material to make the metal follow your design.
Aluminum does not rust when exposed to wet soil. It usually comes with a painted or anodized finish direct from the factory. You can buy it in black, brown or silver to match your landscape colors.
The lighter metal can cost more than bare steel, and it bends permanently if you bump it hard with a mower tire. It shines in complex layouts where you plan a garden layout with sharp curves.
5. Brick and paver borders
Clay bricks and concrete pavers make a traditional, structured border. They clearly separate the lawn from your garden plants. You can lay them flat, stand them on edge, or angle them leaning back in a sawtooth pattern.
A brick border takes time and effort to set correctly. You dig a shallow trench and lay a base of leveling sand. The sand keeps the heavy blocks from sinking unevenly into the mud. The process is similar when you install a paver patio in the yard.
Weeds will grow in the joints between the individual bricks. You can sweep polymer sand into the gaps to block seeds. This specialized sand hardens when wet to lock the pavers together.
6. Natural stone and fieldstone
Heavy natural stones stacked along the bed edge give a yard a rough, earthy look. You can use rounded river rocks or flat flagstone pieces. Local fieldstone piled up to form a low wall also works well to separate the spaces.
Stone easily handles slopes and uneven ground in your yard. You just stack the rocks higher on the low side of the slope. This creates a terrace that keeps the soil level inside the planting bed.
The irregular shapes leave small gaps between the rocks. Soil washes out and weeds take hold in these tiny spaces over time. You will need a string trimmer to cut the grass that grows right up against the rough stone.
7. Gravel trim trenches
A shallow trench filled with decorative gravel makes a clean break between grass and plants. You dig out the sod and lay landscape fabric at the bottom. Then you fill the open space with crushed rock or pea gravel.
The open gravel gives grass runners a harder time crossing into the soil. It drains water quickly after a heavy rain. It also handles foot traffic safely if you step into the bed to prune a bush.
Stray leaves and grass clippings blow into the gravel on windy days. These decompose into dirt and fill the spaces between the stones. You have to rake the rocks out and wash them periodically to stop weeds from growing in the compost.
8. Timber and landscape logs
Pressure-treated lumber, cedar boards and thick landscape timbers build straight, solid borders. Wood builds height fast with just a few stacked pieces. This helps if you want a slight raised bed effect for better soil drainage.
You can check how to build raised garden beds for structural tips. Straight boards only work on straight lines and square corners. You can cut thick timbers into short blocks and stand them on end to form wide curves.
Wood eventually rots when it sits directly against wet soil. Cedar resists decay naturally. Treated lumber lasts for years in the dirt before it softens and falls apart. You secure the wood by driving rebar stakes through holes drilled in the timbers.
9. Recycled and salvaged materials
You can build a border out of leftover roof tiles, old glass bottles, or broken concrete chunks. Salvaged street cobblestones also make an excellent border. Urbanite is the common name for broken concrete patio slabs.
Urbanite chunks stack up to make a sturdy wall that looks a lot like gray flagstone. Reusing materials keeps heavy waste out of the local landfill. It usually costs nothing besides your time and physical effort to move it.
You haul the pieces home in your truck and fit them together. It takes patience to find enough matching material to finish a long garden edge. Irregular chunks require extra dirt backfill to stabilize the loose pieces.
10. Poured concrete curbing
A continuous line of poured concrete acts as a permanent, solid barrier. It blocks most grass roots from creeping into the garden bed. Contractors use a specialized extrusion machine to lay a custom concrete curb right over the grass line.
The machine handles wide curves easily as it moves along the yard. The crew can stamp the wet concrete to look like individual bricks or natural stones. They add dye to the mix so the curb matches the colors on the house or the patio.
Concrete cracks as the ground freezes and thaws. The crew cuts control joints into the curb to control and hide these cracks. A bad frost heave can still break a long, continuous run out of alignment.
11. Plastic and rubber edging
Coils of black plastic and rolled rubber edging offer a fast, cheap way to frame a small garden bed. You dig a narrow slit and push the coiled edge in. You drive plastic spikes through the side tabs to hold it down against the soil.
The flexible material snakes around thick tree trunks and tight corners quickly. Rubber edging made from recycled tires bends smoothly without kinking in the middle. You can roll out long sections with very little digging.
Thin plastic tends to warp in the hot summer sun. It also turns brittle and cracks in the winter cold. The black edge often creeps up above the grass line over time, leaving it in the path of the mower blade.
Request utility marks before you trench
Almost all garden edging requires digging a trench or driving stakes into the ground. Striking an underground power line or a buried gas pipe causes serious injuries and expensive property damage. You cannot guess where these utility lines run under your lawn.
The national dig safe service at 811 says every digging project, regardless of depth, requires contacting 811 a few business days in advance. You can call the short number or submit a request on their state website.
A locator usually visits your yard and marks the lines with paint or flags. These colored marks show exactly where utilities run under the yard. Wait for the marks to be in place before you dig your garden border.
Keep any edge sharp with two jobs a year
The University of Illinois Extension says lawn grass grows into beds about 3 to 4 inches a year, so edging once a year helps.
Plants also outgrow their borders over time. The Illinois Extension says permanent edging material can end up buried under growing shrub and evergreen branches. You have to prune low branches back to keep the hard lines visible and functional.
Mulch holds the bare soil inside your edging. The Illinois Extension says mulch in flower beds typically goes down about an inch deep once settled, and 2 to 3 inches is common in shrub and evergreen beds. Adding a fresh layer restores the sharp contrast between the dark soil and the green lawn.


