- Wild Style Magazine
- Deck Building
- How to lay out deck stairs so the steps come out even
How to lay out deck stairs so the steps come out even
Figuring out how to lay out deck stairs takes simple math and careful measuring. Find your total rise to cut stringers for even, safe steps.
Words by Reuben Stillwagon7 min to read
Laying out deck stairs means measuring the exact vertical drop to the ground and dividing it into equal steps. You then transfer these measurements to a wooden stringer board to cut the profile. Keeping every step the exact same height helps prevent tripping and is part of meeting code.
Measure the total rise from deck to landing
Start by measuring the total rise. This is the exact vertical distance from the top of your finished deck down to the ground. Do not guess this number. A bad measurement here throws off every single step in the flight.
Clamp a long, straight board to the top of the deck frame. Let it extend out over the yard where the stairs will go. Rest a long carpenter level on top of this board. Adjust the board up or down until the bubble sits perfectly in the center.
Measure straight down from the bottom edge of the level board to the ground. Use a stiff tape measure to keep the line plumb.
If your deck frame is bare wood, you have to add the thickness of your final deck boards to this measurement. Your stairs must start from the final walking surface. The final number you find is your total rise. Write it down in a safe spot.
Divide the total rise into equal steps
You must divide the total rise into identical smaller heights. These smaller heights are the risers. A person expects every step to feel exactly the same as the one before it.
Take your total rise and divide it by a riser height of 7 3/4 inches or less. You cannot build a fraction of a step, so round that result up to the next whole number. This whole number tells you exactly how many steps your stairs need.
Divide your total rise by that exact number of steps. The result is your final riser height. Every single riser in your staircase will be exactly that tall.
You must check your math against local building rules. The International Residential Code 2021 caps the riser height at 7 3/4 inches. Local codes can be stricter than the model code, so check with your local building department and get the right permits before you cut wood.
Pick a tread depth that meets code
The tread is the flat horizontal part of the step. You need enough room to plant your foot securely.
The International Residential Code 2021 sets a minimum tread depth of 10 inches, measured between adjacent tread nosings. A nosing is the front edge of the step. It hangs slightly over the vertical riser below it to give your toes extra room.
Many builders construct the tread out of two deck boards. You will leave a small gap between the boards so rainwater can drain through the steps. Measure the finished depth from nosing to nosing to confirm it meets the 10-inch minimum.
Prepare a solid landing spot
Stairs need a firm place to rest at the bottom. You cannot drop heavy wooden stringers directly onto bare dirt or a patch of grass. The ground will settle over time. Your stairs will sink into the mud, and moisture from the soil will quickly rot the wood.
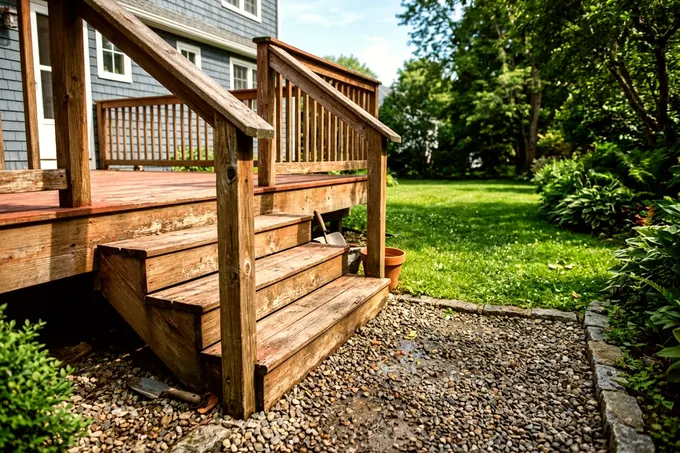
Pour a concrete pad or lay a solid base of pavers for the stairs to land on. Dig out the topsoil and pack down a layer of gravel, following your local code for landing requirements. Pouring a simple concrete slab gives the wood a permanent, dry resting place.
If you prefer stone, building a paver patio that stays flat provides a clean, safe exit point. Finish this landing pad completely before you finalize your stair measurements. The thickness of the concrete or pavers changes the exact distance to the ground. You must measure your total rise to the top of this finished, hard surface.
Account for the thickness of the treads
Laying out deck stairs requires a simple framing trick called dropping the stringer. You have to adjust the bottom cut of your wood to account for the thickness of the tread material.
Think about the lowest step on the stringer. When you attach a tread board to the top of it, that bottom step suddenly becomes taller than all the rest. To fix this problem, you must trim the bottom edge of the stringer where it meets the concrete.
Subtract the exact thickness of your tread material from the bottom riser cut. This simple cut lowers the entire stringer block by the thickness of one tread. When you add the treads back on during assembly, every step ends up identical.
This step prevents dangerous tripping hazards. In one flight, the tallest riser can exceed the shortest by no more than 3/8 inch, and handrails must sit between 34 and 38 inches high. Dropping the stringer helps keep your stairs within this limit.
Mark the stringer board
Buy straight, heavy framing lumber for your stringers. Avoid boards with large knots or severe twists. You also need a large metal framing square and two small brass stair gauges. Stair gauges clamp onto the edges of the framing square to hold your exact measurements steady.
Clamp one gauge on the short arm of the square at your exact riser height. Clamp the other gauge on the long arm at your tread depth. The run is your tread depth, measured nosing to nosing, and it must be at least 10 inches.
Examine your stringer board down its length. Wood naturally curves slightly. Pick the straightest boards and keep the crown facing the same way on every stringer.
Lay the square flat on the wood. Push the brass gauges flush against the long edge of the board. Trace the outside corner of the square with a sharp carpenter pencil. This draws a perfect right angle.
Slide the square down the board. Line the top gauge up precisely with the end of your last pencil mark. Trace the next step. Repeat this zigzag pattern down the entire board until you draw your total number of steps.
Cut the wood carefully
Place the marked stringer on sturdy sawhorses. Wear eye protection and use a standard circular saw to cut the zigzag pattern out of the wood. Work slowly and follow your pencil lines closely.
Do not let the circular saw blade cross the inside corners of your pencil marks. The round blade cuts deeper underneath the wood than it does on top. Overcutting past the line can weaken the stringer and lead to cracks. Stop pushing the saw slightly before the pencil lines meet.
Grab a sharp handsaw to finish the inside corners. A few quick manual pulls will free the triangular block of waste wood. This protects the solid portion of the board.
Use this first cut stringer as a template. Lay it flat on top of your next blank piece of lumber. Trace the zigzag outline directly onto the new wood. This helps every stringer match and saves repeating the layout math.
Space the stringers and attach the stairs
You need enough stringers to hold the weight of people carrying heavy items up and down. A wide staircase naturally requires more support underneath the treads.
Check your local building rules for exact spacing requirements. Much like calculating deck joist spacing and span, keeping the supports close together stops the stair treads from sagging or bouncing underfoot.
Attach the top of the stringers securely to the main deck frame. Use specialized metal stair hardware. Heavy-duty sloped hangers grab the top of the stringer and fasten to the deck frame as the hardware maker directs.
Fasten the bottom of the stringers to your concrete pad or paver landing with galvanized metal angle brackets. Drill concrete anchors into the landing pad to keep the bottom from kicking out.
Finish with a secure handrail
Stairs need a safe handrail to grab, and your local building department can tell you when code requires one. Keep the handrail inside the 34 to 38 inch window noted earlier. You measure this height straight up from the sloped imaginary line connecting the front edges of the tread nosings.
Bolt your wooden rail posts directly to the outside stringers or securely into the deck framing. Use the bolts or fasteners your local code and the hardware maker call for. Posts fastened only to the treads can wobble, so ask your building department how to anchor them.
Take time to review different deck railing ideas to find a style that matches your house. Add balusters between the posts, and check local code for the maximum gap allowed.